NiceVideo
PHP Video CMS and Video Sharing Platform
{ Guide to installing, updating, and configuring NiceVideo. }
New generation & Modern
Developed using the power of PHP and jQuery, NiceVideo offers a sleek user interface and a developer-friendly codebase.
High performance
NiceVideo, thanks to its lightweight and highly optimized architecture, ensures fast loading and a seamless user experience even under heavy traffic.
Powerful and unique
NiceVideo is the closest and best alternative to YouTube when you want to create your own video hosting, viewing, and sharing system.
Recommended Hosting for NiceVideo
There is no sponsorship agreement,
you can launch NiceVideo immediately with any hosting provider.
Introduction
NiceVideo is a powerful, modern, and fully customizable PHP-based Video CMS and Video Sharing Platform, ideal for developers, startups, and businesses looking to launch their own video sharing website similar to YouTube.
Built with clean, framework-free PHP (PDO), NiceVideo emphasizes performance, security, and flexibility, while keeping installation and configuration incredibly simple. Its automatic installation wizard allows you to set up your platform and go live within minutes.
NiceVideo supports video uploading, processing, and management, complemented by a well-organized admin panel that gives you full control over content, users, and system settings. Its scalable architecture and environment-based configuration make it suitable for local, testing, and production environments.
Whether your goal is to create a video sharing platform, a content publishing system, or a custom media project, NiceVideo provides a professional and reliable foundation to launch your project quickly and securely.
Technology & Dependencies
NiceVideo is built entirely with PHP, PDO, jQuery, and AJAX, without relying on frontend frameworks like Tailwind or Bootstrap. Its custom codebase ensures maximum performance and flexibility.
For third-party functionality, NiceVideo uses only the following libraries:
- Font Awesome (icons)
- Ionicons (modern icons)
- Toastr (notifications)
- Dropzone (file uploads)
- Plyr (video playback)
This ensures a lightweight, dependency-controlled environment while still providing essential modern functionalities.
Why Choose NiceVideo?
NiceVideo offers a modern, fast, and highly intuitive video platform inspired by YouTube. Designed with user experience as the top priority, it allows you to launch your own video publishing, sharing, and viewing system in just minutes.
Its scalable architecture ensures your platform can grow effortlessly, while regular updates keep it current and competitive. With NiceVideo, you get a feature-rich, reliable solution that stands out in the industry—setting a high standard for both creators and viewers alike.
NiceVideo for everyone and every project.
Download the official file
If you purchased NiceVideo from the CodeCanyon marketplace, you can download the latest version via the "Downloads" section. In this section, you can also view all the content you have previously purchased.
If you haven't purchased the NiceVideo script and have obtained a cracked version, please be aware that such software often contains various Trojans or similar malicious software. We strongly recommend always opting for a direct purchase for the most reliable versions.
Start installation
Follow these steps to launch NiceVideo.
Before starting the installation, log in to your cPanel, DirectAdmin, or similar application and create a new PhpMyAdmin user account, username, and password.
These will be needed when installing the NiceVideo script.
1. Extract the downloaded package and open the Source folder to find all the script files.
You will need to upload these files to your web server using FTP or localhost to use them on your website.
2. Below is the folder structure and needs to be uploaded to your website or localhost root directory:
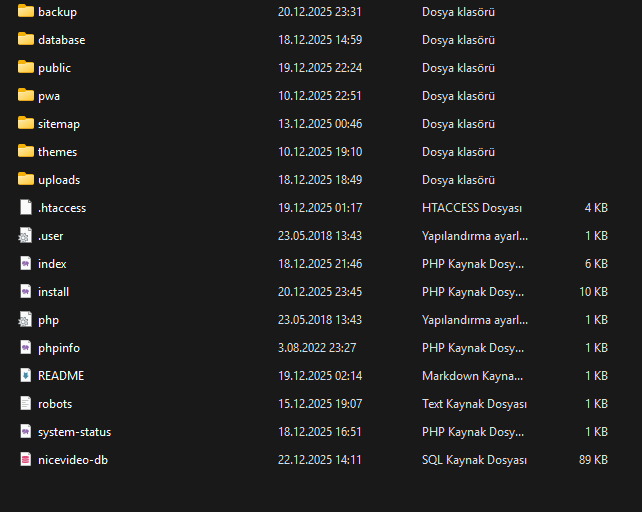 3. You must upload all files.
4. Once you are done uploading, open your browser (Google Chrome is recommended).
5. Go to http://www.YOUR-WEBSITE.com/install.php
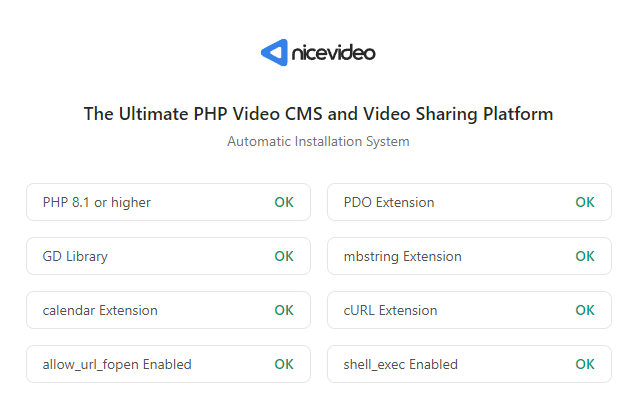
6. Before we start the installation, please make sure you have the following installed on your server:
7. If everything is complete so far, now make sure you fill in the necessary data:
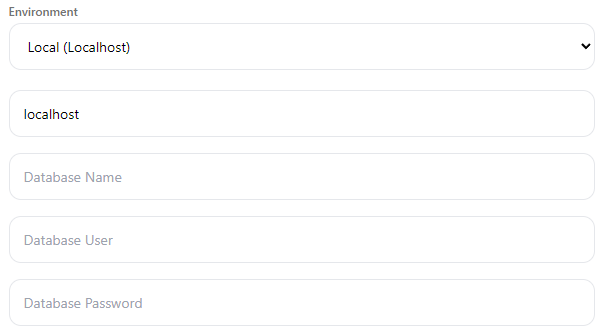
- SQL Host name - MySQL host name, e.g: localhost
- SQL Username - MySQL username.
- SQL Password - MySQL user password.
- SQL Database - MySQL database name.
Once you have wrote the information, please click the Install button and wait for a while, the installation process may take up to 5 minutes.
After your installation is successfully completed, don't forget to delete the install.php file located in the main directory.
The process is complete; you can now connect directly to your own website: https://your-website.com
You're ready to begin!
After logging into your account, you can access the admin panel from the drop-down menu or at https://your-website.com/admin_panel
Administrator account login information:
E-mail address: demo@admin.com
Password: 123456789
Make SSL mandatory and install it.
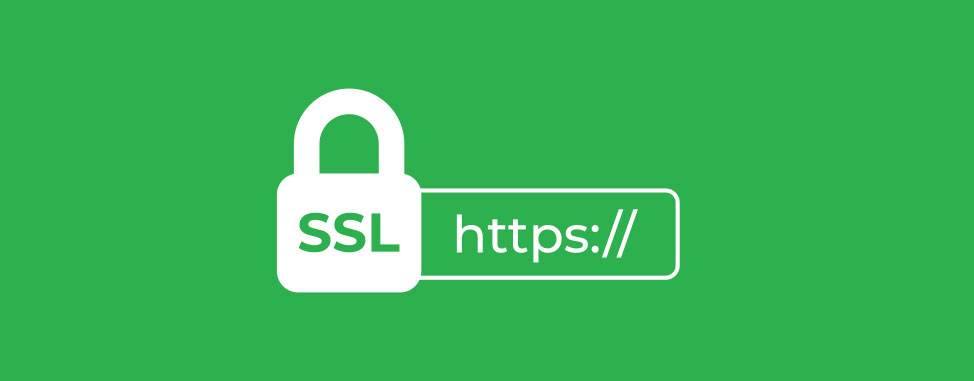
Today, one of the most important rules for every website is to minimize various attacks on HTTP requests by making SSL mandatory and accepting requests with HTTPS instead of HTTP.
Although NiceVideo provides various security factors at the core of its system, we strongly recommend enabling SSL for a more advanced level of protection.
We've prepared a short guide to help you make SSL mandatory on your server. By following the steps below, you can directly require HTTPS for HTTP requests.
-
Open { .htaccess } file located in root directory.
-
To redirect your website to SSL, copy and paste the code below after RewriteEngine On
RewriteCond %{HTTPS} off
RewriteRule (.*) https://%{HTTP_HOST}%{REQUEST_URI} [R,L]
-
To redirect your website to www, copy and paste the code below after RewriteEngine On
RewriteCond %{HTTP_HOST} ^[^.]+\.[^.]+$
RewriteCond %{HTTPS}s ^on(s)|
RewriteRule ^ http%1://www.%{HTTP_HOST}%{REQUEST_URI} [L,R=301]
Important note: The NiceVideo script comes with SSL set by default in the .htaccess file. However, if this doesn't work, you can follow the steps above to update and fix the settings.
RewriteRule (.*) https://%{HTTP_HOST}%{REQUEST_URI} [R,L]
RewriteCond %{HTTPS}s ^on(s)|
RewriteRule ^ http%1://www.%{HTTP_HOST}%{REQUEST_URI} [L,R=301]
Important note: The NiceVideo script comes with SSL set by default in the .htaccess file. However, if this doesn't work, you can follow the steps above to update and fix the settings.
System requirements
To ensure the NiceVideo script runs smoothly on your server, make sure your server/system requirements meet the plugin and other requirements needed for the script.
Ensure these plugins are installed for the script to work optimally.
These are:- PHP 8.1 or higher
- PDO.
- GD Library PHP extension.
- mbstring PHP extension.
- calendar PHP extension.
- shell_exec PHP function.
- cURL + allow_url_fopen enabled.
-
FFMPEG
(This is required to upload videos to your server.)
NiceVideo Features
What features await you at NiceVideo?
NiceVideo is a fully featured video content management system (CMS) and video platform.
Video Management
-
Video uploads
-
YouTube video importing
-
Video quality transcoding (FFMPEG)
-
Subtitle editor
-
Public, private, and scheduled videos
-
Optimized video delivery
User & Channel System
-
User registration, login, and password recovery
-
Social login support
-
Channel creation and management
-
Channel subscription system
-
Channel analytics and insights
-
Verified account system
Interaction & Engagement
-
Like / dislike system
-
Video comments
-
Watch later
-
Liked videos playlist
-
Recommended videos
-
Watch history and search history
-
Content reporting system
Admin & Control Panel
-
Powerful admin panel
-
User and content management
-
Maintenance mode
-
Enable / disable user registration
-
Dynamic pages (Privacy Policy, Terms of Service)
-
Email notification system
-
and more
Performance & SEO
-
Multi-language support
-
SEO-optimized URLs
-
Automatic sitemap generation
-
PWA (Progressive Web App) support
-
Fast and lightweight architecture
Security & Privacy
-
GDPR compliant
-
Secure authentication
-
Environment-based configuration
-
Clean and secure PHP 8.1+ codebase
And much more...
Video Management
User & Channel System
Interaction & Engagement
Admin & Control Panel
Performance & SEO
Security & Privacy
How do I update the NiceVideo script?
When the first update (a newer version) of this script is released, the Update Documentation will be included.
I'm currently working on an Automatic Upgrader to make it easier for customers to update (upgrade to a higher version) their scripts.
This will be added with the first update.
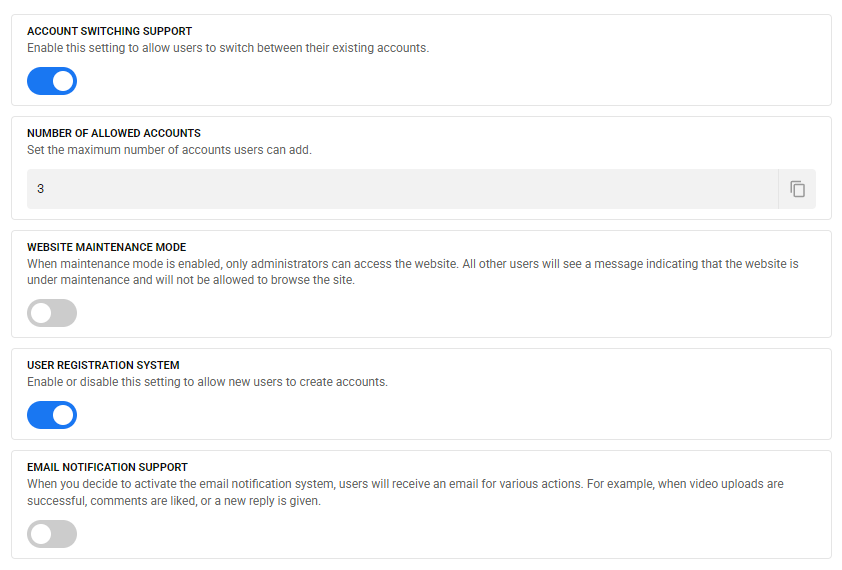
General configuration settings
NiceVideo enables you to control how your website will function and what users can do.
For example, NiceVideo allows you to do things like put your website down for maintenance, turn the user registration system on and off, turn email notifications on or off, turn the account switching system on and off, etc.
Please note that we will be offering site owners more general settings options in future updates.
To do this, follow these steps:
-
First, log in to your administrator account on NiceVideo (your website).
-
After logging in, click on the "General configuration" tab located just below the "Settings" text in the left sidebar.
-
Then click the slider button to turn it on or off. And, you can set how many accounts users can add.
That's all.
That's all.
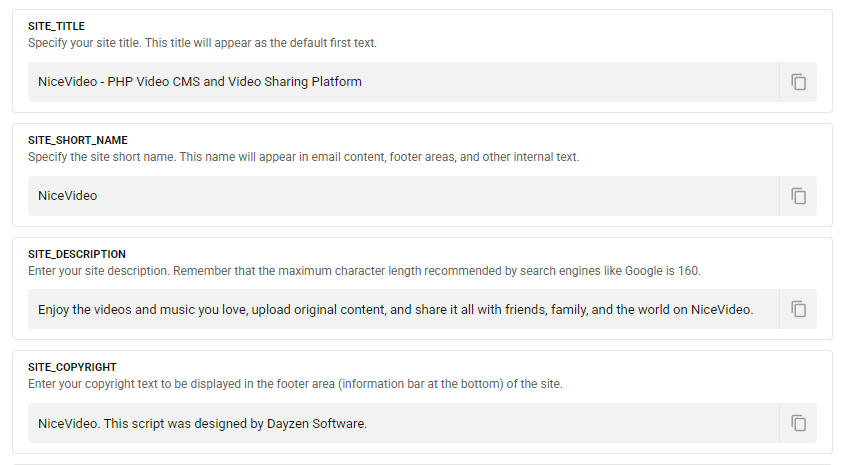
Change the title, short name, description, etc.
One of the most important steps in fully branding your own NiceVideo script is to set up your site's title, short name, description, and copyright text.
To do this, follow these steps:
-
First, log in to your administrator account on NiceVideo (your website).
-
After logging in, click on the "Website information" tab located just below the "Settings" text in the left sidebar.
-
Next, customize the text fields within the corresponding boxes entirely to match your branding and click the "Save Changes" button to complete the process.
That's all.
That's all.
Add a new language or delete an existing language.
NiceVideo currently only officially supports the following languages: English, Russian, and Turkish.
This process is designed to reduce system load on the NiceVideo script core, and by using the "English" language file, one of the world's most widely spoken languages, we allow users to manually translate their own language in a very short time (usually 45-60 minutes).
Now let's look at how you can add a new language and how you can manually translate the language you've added.
To do this, follow these steps:
-
First, log in to your administrator account on NiceVideo (your website).
-
After logging in, click on the "Language management" tab located just below the "Settings" text in the left sidebar.
-
The first page you'll see is "Language management," which lists all the available languages on your system. (Click on the screenshot below to view it.)
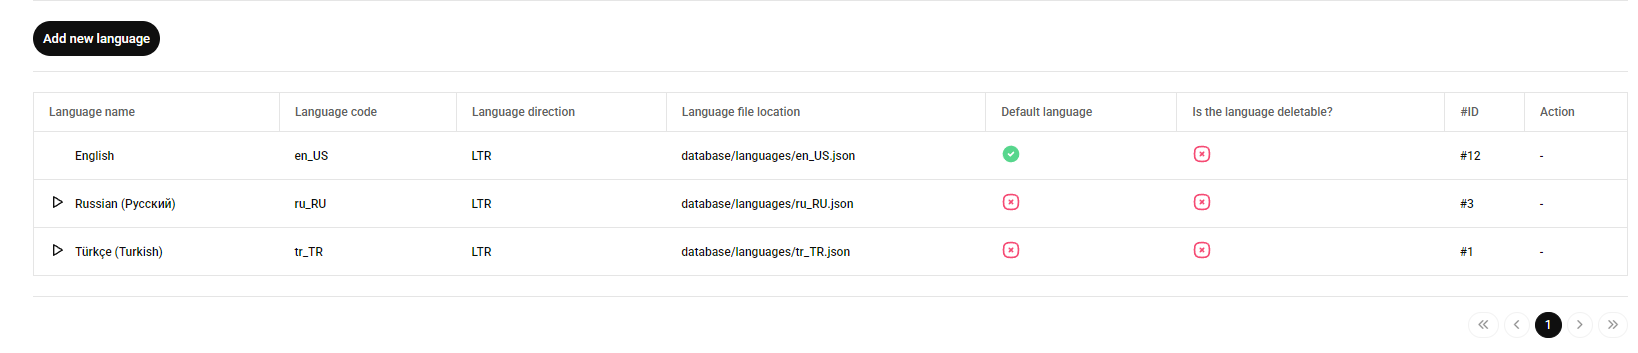
Clicking the "Trash can icon" on the right will delete the language file. However, note that NiceVideo does not allow you to delete the built-in "Officially supported languages" that come with the system.
The language deletion feature will only apply to language files that you have added. For example, if NiceVideo doesn't have "Japanese," and you create the "Japanese" language file, the system will allow you to delete it.
---
To add a new language, click the "Add new language" button in the upper left corner.
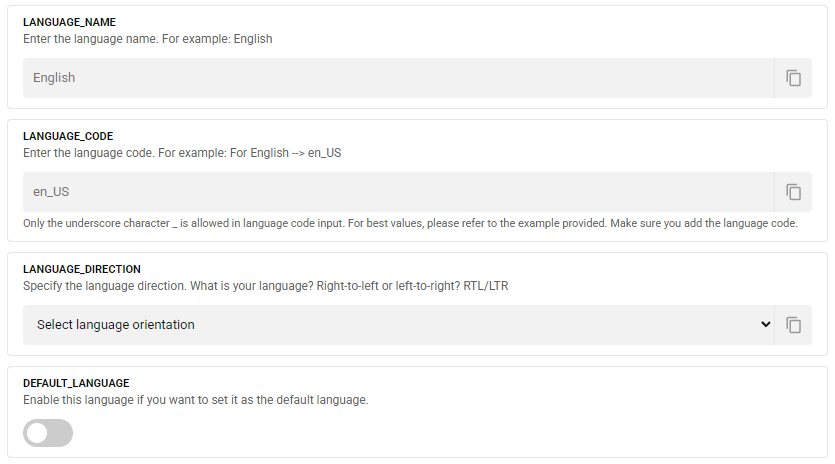 To add a new language, define the required
 LANGUAGE_NAME, LANGUAGE_CODE, and LANGUAGE_DIRECTION structures, then specify the "Will this be the default first language?" option, and click the Add new language button to complete the process.
LANGUAGE_NAME --> English
LANGUAGE_CODE --> en_US
LANGUAGE_DIRECTION --> LTR or RTL
AND
DEFAULT_LANGUAGE --> Enabled or Disabled
After adding all these new languages, the next step is to manually translate your language. This language translation process usually takes 45 to 60 minutes.
In NiceVideo, language files are always stored and processed as LANG_CODE.json Your new language option will be located in the database/languages/ directory.

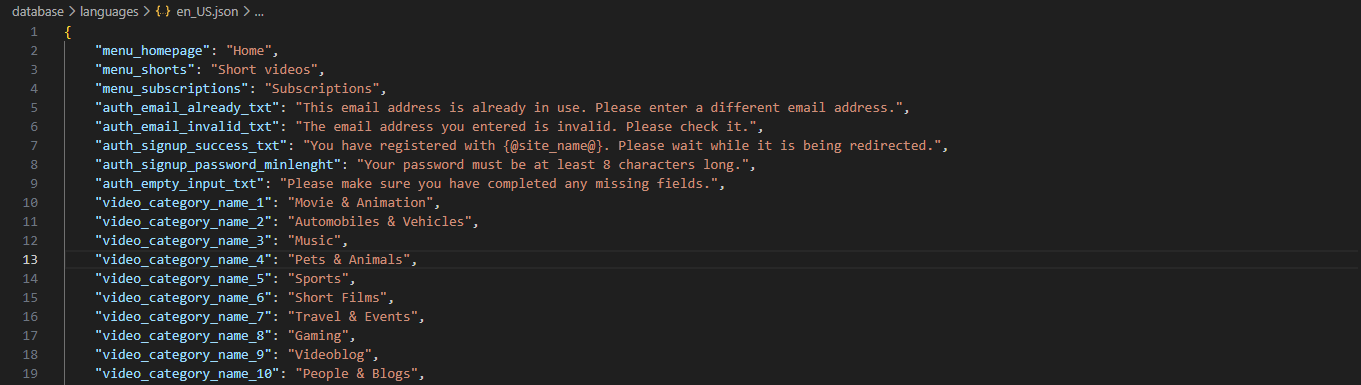
Next, begin translating the "Text/Sentence" fields corresponding to the key codes into your own language and save using CTRL + S. (Your changes will be reflected on your website immediately after saving.)
Example edit:
"menu_homepage": "Home", Your own language will correspond to the text: "menu_homepage": "This is Homepage"
Clicking the "Trash can icon" on the right will delete the language file. However, note that NiceVideo does not allow you to delete the built-in "Officially supported languages" that come with the system.
The language deletion feature will only apply to language files that you have added. For example, if NiceVideo doesn't have "Japanese," and you create the "Japanese" language file, the system will allow you to delete it.
---
To add a new language, click the "Add new language" button in the upper left corner.
LANGUAGE_NAME, LANGUAGE_CODE, and LANGUAGE_DIRECTION structures, then specify the "Will this be the default first language?" option, and click the Add new language button to complete the process.
LANGUAGE_CODE --> en_US
LANGUAGE_DIRECTION --> LTR or RTL
AND DEFAULT_LANGUAGE --> Enabled or Disabled
After adding all these new languages, the next step is to manually translate your language. This language translation process usually takes 45 to 60 minutes.
In NiceVideo, language files are always stored and processed asLANG_CODE.jsonYour new language option will be located in thedatabase/languages/directory.
Next, begin translating the "Text/Sentence" fields corresponding to the key codes into your own language and save using CTRL + S. (Your changes will be reflected on your website immediately after saving.)
Example edit:
"menu_homepage": "Home", Your own language will correspond to the text:"menu_homepage": "This is Homepage"
Set your default language
How to set the default website language?
You can set the default language from Admin Control Center > Settings > Language Management
After that, simply click the "" icon next to the default language you want to set.
Dynamic page operations
How to edit terms, policy, about, cookie etc?
You can edit those pages from Admin Control Center > Dynamic pages > All dynamic pages
How do I add a new page?
You can add new pages from here Admin Control Center > Dynamic pages > Add new page
Admin Control Center > Dynamic pages > All dynamic pagesAdmin Control Center > Dynamic pages > Add new pageConfigure the installation settings and install FFMPEG.
FFMPEG is used by the NiceVideo system to convert all video files at different resolutions.
Instead of directly using FFMPEG within the NiceVideo script and potentially bloating the system, we used the FFMPEG directory directly on Windows or Linux-based servers.
Now, proceed with the FFMPEG installation and activate your system using the steps below:
-
Go to your admin panel and navigate to "Upload settings" under "Settings" in the left sidebar.
-
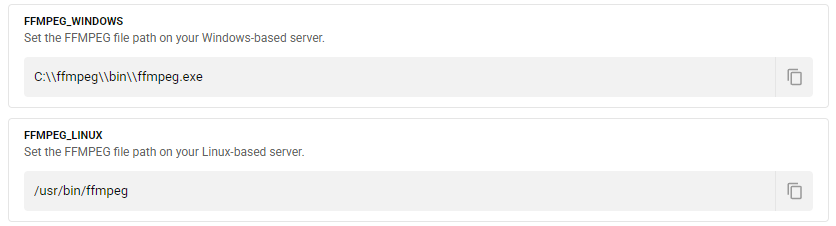
For Windows servers, the default location for
FFMPEG_WINDOWS is
C:\\ffmpeg\\bin\\ffmpeg.exe
-
For Linux servers, the default location for
FFMPEG_LINUX is
/usr/bin/ffmpeg
-
Replace the
FFMPEG_WINDOWS or FFMPEG_LINUX values here with the FFMPEG paths on your server.
If you don't know where your FFMPEG file paths are located, contact your server/system administrators to find out the exact locations of the file paths.
We assume you have completed these two steps and we will continue.
-
Set the maximum file size (in GB) that users can upload directly to your system under the
MAXIMUM_FILE_SIZE options. The minimum value is 1GB and the maximum is 256GB.
 The default maximum upload size is 256GB.
-
Next, enable FFMPEG via the
FFMPEG_STATUS section and try uploading a new video to your website.

-
If you are receiving a corrupted video file or are still seeing the
Video is being converted message, you will need to use the ffmpeg library on your server. To install ffmpeg on your server, follow these links:
-
How to install FFMPEG on Centos 7? Click here.
-
How to install FFMPEG on Centos 8? Click here.
-
How to install FFMPEG on Ubuntu? Click here.
-
How to install FFMPEG on debian? Click here.
-
Alternatively, contact your server/system administrators and ask them to do this for you.
FFMPEG_WINDOWS is
C:\\ffmpeg\\bin\\ffmpeg.exe
FFMPEG_LINUX is
/usr/bin/ffmpeg
FFMPEG_WINDOWS or FFMPEG_LINUX values here with the FFMPEG paths on your server.
We assume you have completed these two steps and we will continue.
MAXIMUM_FILE_SIZE options. The minimum value is 1GB and the maximum is 256GB.
FFMPEG_STATUS section and try uploading a new video to your website.
Video is being converted message, you will need to use the ffmpeg library on your server. To install ffmpeg on your server, follow these links:
- How to install FFMPEG on Centos 7? Click here.
- How to install FFMPEG on Centos 8? Click here.
- How to install FFMPEG on Ubuntu? Click here.
- How to install FFMPEG on debian? Click here.
- Alternatively, contact your server/system administrators and ask them to do this for you.
Customize your logo and favicon.
Changing your logo and favicon on NiceVideo is incredibly easy and allows you to perfectly reflect your brand in just a few seconds.
Follow these steps:
-
First, log in to your administrator account on NiceVideo (your website).
-
After logging in, click on the "Logo & Favicon Settings" tab located just below the "Settings" text in the left sidebar.
-
Next, select your "Logo" or "Favicon" icons by clicking on the corresponding boxes. Your selections will be automatically saved and instantly viewable by everyone.
Set up the SMTP email sending system.
NiceVideo provides email notifications to users to inform them of various events and requests such as password resets.
Follow the steps below to set up your SMTP service. If you complete these steps correctly, the service should work perfectly.
-
First, log in to your administrator account on NiceVideo (your website).
-
After logging in, click on the "Email settings" tab located just below the "Settings" text in the left sidebar.
-
Next, you need to fill in the boxes shown in the screenshot below with your SMTP server information and save.
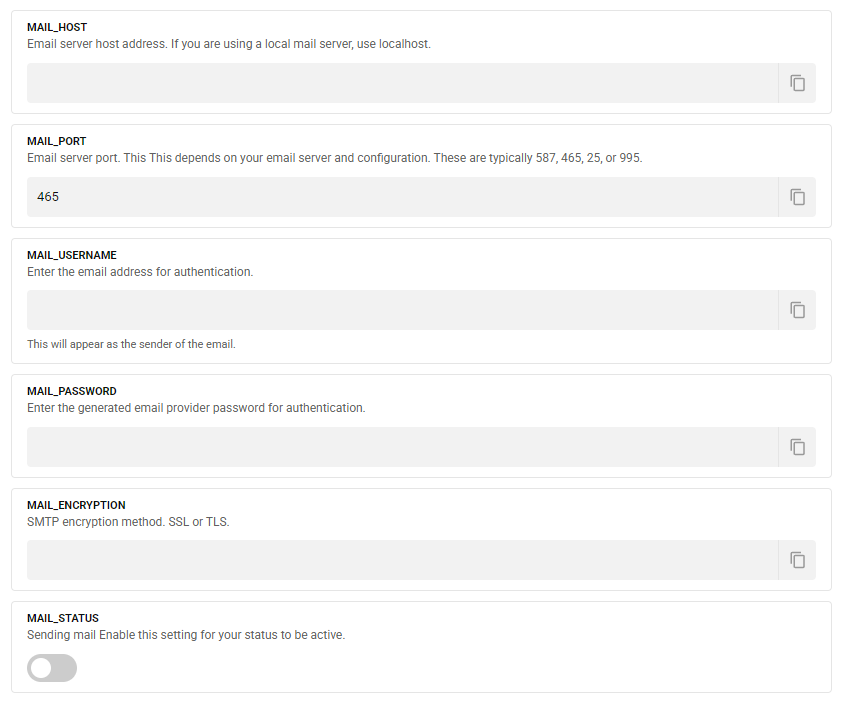
MAIL_HOST --> Your email host. For example: smtp.gmail.com
MAIL_PORT --> The commonly used number is 465. However, other options include 587, 25, or 995.
MAIL_USERNAME --> example@gmail.com (Your email address to send the email to.)
MAIL_PASSWORD --> Email password. (If you are using Gmail, this is a custom-generated application password.)
MAIL_ENCRYPTION --> SSL or TLS
MAIL_STATUS --> Enable it to send emails.
For the smoothest SMTP experience, we strongly recommend using Gmail! If you don't know how to retrieve Gmail SMTP information, please check the steps via this link: https://elementor.com/blog/gmail-smtp/
After completing these steps, proceed to the following steps to test that the SMTP settings are configured correctly:
-
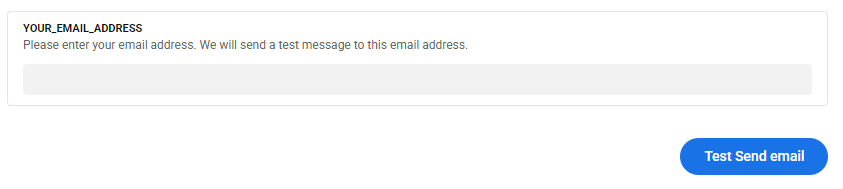
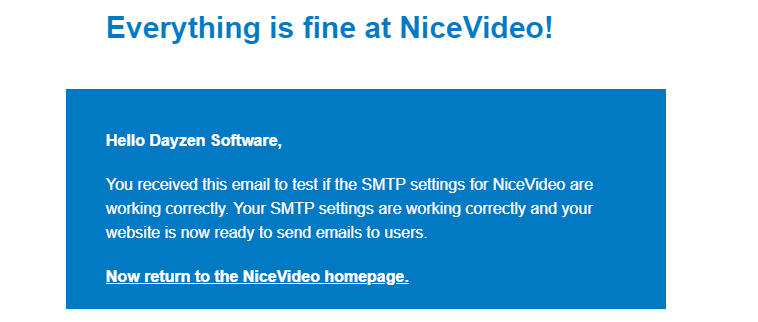
Go directly to www.your-site.com/admin_panel/send_email, enter your email address, and then click the "Send test email" button.
-
Once your SMTP settings are correctly configured, you will receive an "Email sent" notification. Then, visit your email > inbox. You should have received an email similar to the one in the image below.
-
That's all there is to it!
MAIL_HOST --> Your email host. For example: smtp.gmail.com
MAIL_PORT --> The commonly used number is 465. However, other options include 587, 25, or 995.
MAIL_USERNAME --> example@gmail.com (Your email address to send the email to.)
MAIL_PASSWORD --> Email password. (If you are using Gmail, this is a custom-generated application password.)
MAIL_ENCRYPTION --> SSL or TLS
MAIL_STATUS --> Enable it to send emails.
For the smoothest SMTP experience, we strongly recommend using Gmail! If you don't know how to retrieve Gmail SMTP information, please check the steps via this link: https://elementor.com/blog/gmail-smtp/
After completing these steps, proceed to the following steps to test that the SMTP settings are configured correctly:
-
Go directly to www.your-site.com/admin_panel/send_email, enter your email address, and then click the "Send test email" button.
-
Once your SMTP settings are correctly configured, you will receive an "Email sent" notification. Then, visit your email > inbox. You should have received an email similar to the one in the image below.
-
That's all there is to it!
YouTube Data API Key
NiceVideo has a system that allows importing YouTube videos.
However, you need a YouTube Data API Key for this.
If you want to allow imports from YouTube, proceed to this step.
To obtain this API key, please complete the steps below.- Go to the Google API Manager console and log in using your Google credentials.
- After this click on Create Project link for create new project.
- Enter Project Name and click on Create button.
- Select the project from the dropdown menu beside Google Cloud Platform.
- Click on APIs & Services then click on +Enable APIs and Services .
- Search for YouTube Data API v3 and enable YouTube Data API v3.
- Once enabled, click on Credentials, on the top nav-bar, click on +Create credentials then click on API key
- Grab the key and Click Close.
-
Go to Admin Control Center -> General configuration -> YouTube Data API Key
(YouTube API Key - Enter the API key you created in the previous chapter.)

Sitemap Setup
NiceVideo provides a clean structure that search engines like Google, Yandex, Yahoo, etc., appreciate, allowing them to list your website's content.
Your sitemap will be automatically generated continuously in the background, so all you'll need to do is enter your domain name in just a few seconds.
Complete the following steps:
-
Go to the main directory of your server (where the script is installed).
-
Open the robots.txt file with a code editor.
-
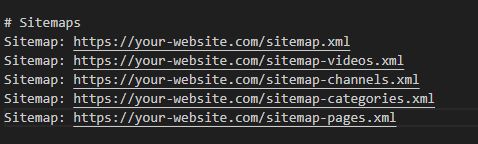
Then replace the text in this section with your own website address.
https://www.YOUR-WEBSITE.com/sitemap.xml
https://www.YOUR-WEBSITE.com/sitemap-videos.xml
https://www.YOUR-WEBSITE.com/sitemap-channels.xml
https://www.YOUR-WEBSITE.com/sitemap-categories.xml
https://www.YOUR-WEBSITE.com/sitemap-pages.xml
-
Next, save the file and submit your sitemaps to Google Search Console or other search engines.
That's all!
https://www.YOUR-WEBSITE.com/sitemap.xml
https://www.YOUR-WEBSITE.com/sitemap-videos.xml
https://www.YOUR-WEBSITE.com/sitemap-channels.xml
https://www.YOUR-WEBSITE.com/sitemap-categories.xml
https://www.YOUR-WEBSITE.com/sitemap-pages.xml
That's all!
PWA Setup
NiceVideo directly supports PWA (Progressive Web App) systems.
PWAs allow websites to be viewed on mobile and tablet devices as if they were applications.
The PWA system is automatically included in the script, and the entire system is automatically installed and ready to use for you.
To activate PWA, follow these steps:
-
Log in with your administrator account.
-
Next, go to your admin panel:
https://your-website.com/admin_panel
-
Next, click on the
Website information tab located under "Settings" in the left sidebar.
-
Next, go to the
PWA_SUPPORTED_STATUS field and activate it by clicking the button (it should be blue) in that field.
That's all! Users can now download the PWA.
https://your-website.com/admin_panel
Website information tab located under "Settings" in the left sidebar.
PWA_SUPPORTED_STATUS field and activate it by clicking the button (it should be blue) in that field.
Code customizations
NiceVideo is perfectly coded.
Adding a new feature, changing the design or layout is quite easy, and everything is clearly visible.
Where are the CSS and JS files?
-
You can find the CSS files here -->
./themes/default/statics/styles/main
-
You can find the JS files here -->
./themes/default/statics/script/main
Where are the PHP (content) files?
-
You can find the ALL files here -->
./themes/default/apps
and,
-
You can find the auth files here -->
./themes/default/apps/auth
-
You can find the homepage files here -->
./themes/default/apps/homepage
-
You can find the channel files here -->
./themes/default/apps/channel
-
You can find the history files here -->
./themes/default/apps/history
-
You can find the dynamic pages files here -->
./themes/default/apps/pages
-
You can find the play list (liked videos) files here -->
./themes/default/apps/play_list
-
You can find the report history files here -->
./themes/default/apps/report_history
-
You can find the searching files here -->
./themes/default/apps/searching
-
You can find the account settings files here -->
./themes/default/apps/settings
-
You can find the studio files here -->
./themes/default/apps/studio
-
You can find the watching files here -->
./themes/default/apps/watching
-
You can find the admin panel files here -->
./themes/default/apps/admin_panel
-
You can find the 404 files here -->
./themes/default/apps/404
-
You can find the main files here -->
./themes/default/apps/main
-
You can find the email contents files here -->
./themes/default/apps/email_contents
Where are the system kernel files located?
-
You can find the database file here -->
./themes/database/db.php
-
You can find the web core file here -->
./themes/database/web-core.php
And access all the function files related to the system's operation:
-
You can find the all functions files here -->
./themes/database/functions
-
You can find the website settings processes files files here -->
./themes/database/functions/platform
-
You can find the search processes files files here -->
./themes/database/functions/search
-
You can find the studio processes files files here -->
./themes/database/functions/studio
-
You can find the channel processes files files here -->
./themes/database/functions/channel
-
You can find the watching processes files files here -->
./themes/database/functions/watching
-
You can find the all user processes files files here -->
./themes/database/functions/users
Where are the files for Ajax operations?
-
All the files containing the Ajax operations are located here: -->
./public/ajax
-
Admin panel ajax operations file: -->
./public/ajax/admin_panel_service
-
Channel ajax operations file: -->
./public/ajax/channel_service
-
Download (GDPR) ajax operations file: -->
./public/ajax/download_service
-
Users history for Ajax operations file: -->
./public/ajax/history_service
-
Settings ajax operations file: -->
./public/ajax/settings_service
-
Studio ajax operations file: -->
./public/ajax/studio_services
-
Watching page ajax operations file: -->
./public/ajax/watch_service
./themes/default/statics/styles/main
./themes/default/statics/script/main
-
You can find the ALL files here -->
./themes/default/apps
and,
-
You can find the auth files here -->
./themes/default/apps/auth -
You can find the homepage files here -->
./themes/default/apps/homepage -
You can find the channel files here -->
./themes/default/apps/channel -
You can find the history files here -->
./themes/default/apps/history -
You can find the dynamic pages files here -->
./themes/default/apps/pages -
You can find the play list (liked videos) files here -->
./themes/default/apps/play_list -
You can find the report history files here -->
./themes/default/apps/report_history -
You can find the searching files here -->
./themes/default/apps/searching -
You can find the account settings files here -->
./themes/default/apps/settings -
You can find the studio files here -->
./themes/default/apps/studio -
You can find the watching files here -->
./themes/default/apps/watching -
You can find the admin panel files here -->
./themes/default/apps/admin_panel -
You can find the 404 files here -->
./themes/default/apps/404 -
You can find the main files here -->
./themes/default/apps/main -
You can find the email contents files here -->
./themes/default/apps/email_contents
-
You can find the database file here -->
./themes/database/db.php -
You can find the web core file here -->
./themes/database/web-core.php
And access all the function files related to the system's operation:
-
You can find the all functions files here -->
./themes/database/functions -
You can find the website settings processes files files here -->
./themes/database/functions/platform -
You can find the search processes files files here -->
./themes/database/functions/search -
You can find the studio processes files files here -->
./themes/database/functions/studio -
You can find the channel processes files files here -->
./themes/database/functions/channel -
You can find the watching processes files files here -->
./themes/database/functions/watching -
You can find the all user processes files files here -->
./themes/database/functions/users
-
All the files containing the Ajax operations are located here: -->
./public/ajax -
Admin panel ajax operations file: -->
./public/ajax/admin_panel_service -
Channel ajax operations file: -->
./public/ajax/channel_service -
Download (GDPR) ajax operations file: -->
./public/ajax/download_service -
Users history for Ajax operations file: -->
./public/ajax/history_service -
Settings ajax operations file: -->
./public/ajax/settings_service -
Studio ajax operations file: -->
./public/ajax/studio_services -
Watching page ajax operations file: -->
./public/ajax/watch_service
Social Login Setup
NiceVideo comes with a lot of social login plugins, your users can register to your website with one click!
Here is a setup guide on configuring social login.
How to set up Google Social Login?
-
On the Google API Manager page, select a project from the top or create a new project by clicking “New Project”.
-
From the left menu, go to APIs & Services → OAuth consent screen.
-
Select External as the usage type and continue.
-
Please fill in the App name, User support email, and Developer contact information fields.
-
In the Scopes step, you can continue with the default settings (email and profile are sufficient).
-
In the Test users section, add the test email addresses that will log in with Google.
-
From the left menu, go to APIs & Services → Credentials.
-
Click on Create Credentials → OAuth client ID.
-
Select Web application as the application type.
-
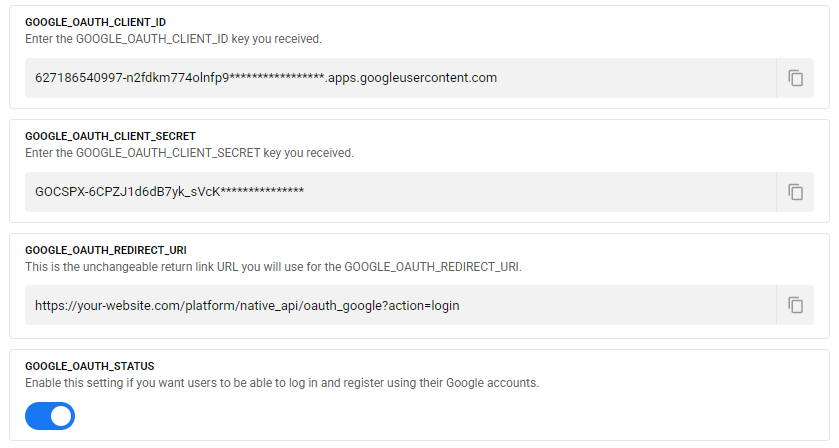
Add the following address to the Authorized redirect URIs field:
https://your-website.com/platform/native_api/oauth_google?action=login
-
Once the creation process is complete, you will be given a Client ID and a Client Secret.
-
Use these values in your application in the following way:
GOOGLE_OAUTH_CLIENT_ID
GOOGLE_OAUTH_CLIENT_SECRET
Add your information to the "GOOGLE_OAUTH_CLIENT_ID and GOOGLE_OAUTH_CLIENT_SECRET" fields on the "Admin Control Center --> Third-party login" page.
-
Next, to enable the Google login system: activate the "GOOGLE_OAUTH_STATUS" structure and save the changes.
https://your-website.com/platform/native_api/oauth_google?action=login
GOOGLE_OAUTH_CLIENT_ID
GOOGLE_OAUTH_CLIENT_SECRET
Add your information to the "GOOGLE_OAUTH_CLIENT_ID and GOOGLE_OAUTH_CLIENT_SECRET" fields on the "Admin Control Center --> Third-party login" page.
How to set up Twitter Social Login?
-
Go to the X (Twitter) Developer Portal and log in with your X account.
-
From the dashboard, click “Create App” or select an existing application.
-
Enter your App name, description, and website URL, then continue.
-
After the app is created, go to the Settings tab of your application.
-
Enable OAuth 2.0 under the Authentication section.
-
Set App permissions to Read (email is optional and depends on your approval status).
-
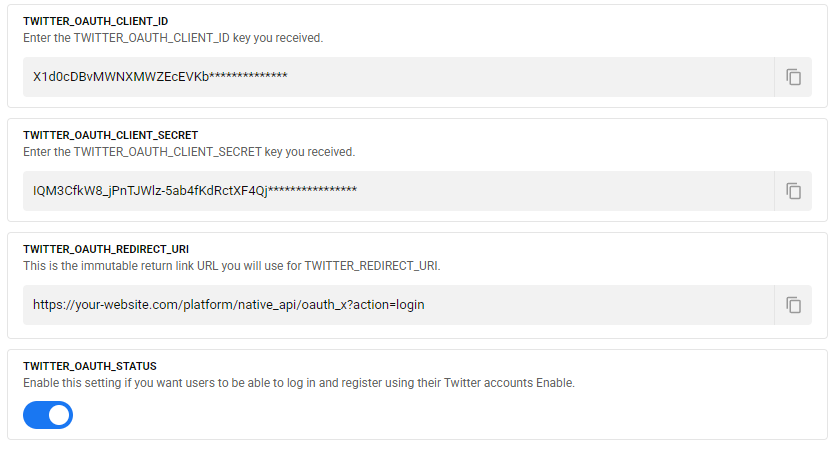
Add the following address to the Callback / Redirect URI field:
https://your-website.com/platform/native_api/oauth_x?action=login
-
Save your changes and navigate to the Keys and Tokens section.
-
Copy your Client ID and Client Secret.
-
Use these values in your application as follows:
TWITTER_OAUTH_CLIENT_ID
TWITTER_OAUTH_CLIENT_SECRET
Add your credentials to the "TWITTER_OAUTH_CLIENT_ID and TWITTER_OAUTH_CLIENT_SECRET"
fields on the Admin Control Center → Third-party login page.
-
Finally, enable the Twitter (X) login system by activating the "TWITTER_OAUTH_STATUS" option and save your changes.
https://your-website.com/platform/native_api/oauth_x?action=login
TWITTER_OAUTH_CLIENT_ID
TWITTER_OAUTH_CLIENT_SECRET
Add your credentials to the "TWITTER_OAUTH_CLIENT_ID and TWITTER_OAUTH_CLIENT_SECRET" fields on the Admin Control Center → Third-party login page.
How to set up GitHub Social Login?
-
Go to GitHub Developer Settings
and log in with your GitHub account.
-
Click “OAuth Apps” from the left menu, then press “New OAuth App”.
-
Fill in the Application name, Homepage URL, and Application description fields.
-
In the Authorization callback URL field, add the following address:
https://your-website.com/platform/native_api/oauth_github?action=login
-
Click “Register application” to complete the creation process.
-
After registration, you will see your Client ID on the application page.
-
Click “Generate a new client secret” to create your Client Secret.
-
Use these values in your application as follows:
GITHUB_CLIENT_ID
GITHUB_CLIENT_SECRET
Add your credentials to the
"GITHUB_CLIENT_ID and GITHUB_CLIENT_SECRET"
fields on the Admin Control Center → Third-party login page.
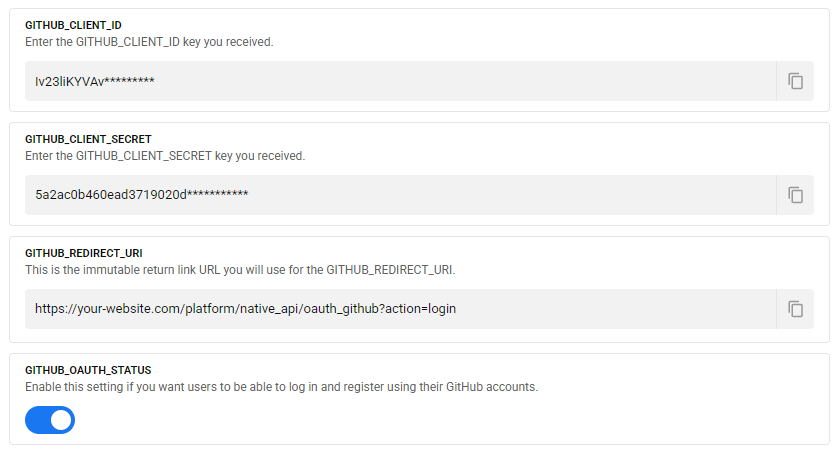
-
Finally, enable the GitHub login system by activating the
"GITHUB_OAUTH_STATUS" option and save your changes.
https://your-website.com/platform/native_api/oauth_github?action=login
GITHUB_CLIENT_ID
GITHUB_CLIENT_SECRET
Add your credentials to the "GITHUB_CLIENT_ID and GITHUB_CLIENT_SECRET" fields on the Admin Control Center → Third-party login page.
How to set up Twitch Social Login?
-
Go to the Twitch Developer Console
and log in with your Twitch account.
-
From the dashboard, click “Register Your Application”.
-
Enter your Application Name, OAuth Redirect URL, and select a category.
-
In the OAuth Redirect URL field, add the following address:
https://your-website.com/platform/native_api/oauth_twitch?action=login
-
Click “Create” to register your application.
-
After creation, your Client ID will be displayed on the application page.
-
Click “New Secret” to generate your Client Secret.
-
Use these values in your application as follows:
TWITCH_CLIENT_ID
TWITCH_CLIENT_SECRET
Add your credentials to the
"TWITCH_CLIENT_ID and TWITCH_CLIENT_SECRET"
fields on the Admin Control Center → Third-party login page.
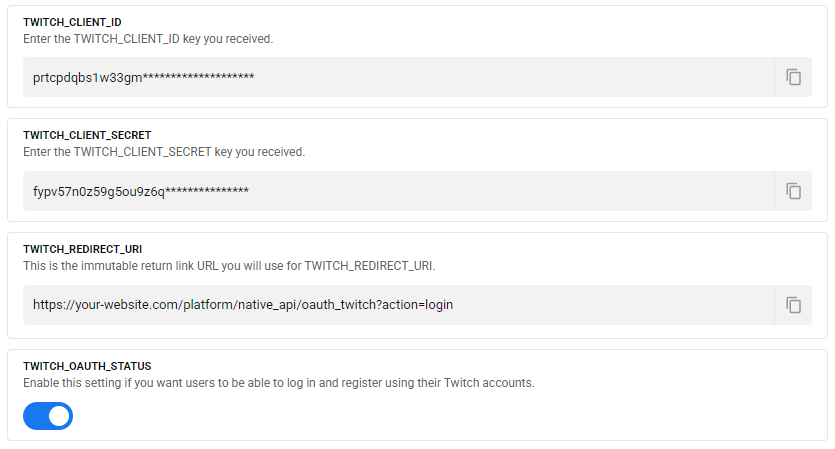
-
Finally, enable the Twitch login system by activating the
"TWITCH_OAUTH_STATUS" option and save your changes.
https://your-website.com/platform/native_api/oauth_twitch?action=login
TWITCH_CLIENT_ID
TWITCH_CLIENT_SECRET
Add your credentials to the "TWITCH_CLIENT_ID and TWITCH_CLIENT_SECRET" fields on the Admin Control Center → Third-party login page.
Support
If this document doesn't answer your questions, please email us.
If you purchased the script, please contact us using this form: https://codecanyon.net/user/dayzensoftware#contact
If you haven't purchased it yet, please email us at robertdayzen@gmail.com
We are located in the GMT +3 time zone and we answer all questions within 12–24 hours on weekdays. In some rare cases, the waiting time can be up to 48 hours (except during holiday seasons, which may take longer).
While we aim to provide the best possible support, please note that this applies only to verified recipients and only covers issues (such as bugs and problems) related to our template. Custom modifications or third-party module implementations are not included in this coverage.
Don’t forget to Rate NiceVideo!
Please add your comments (opinion) about our script. This would be a great help to us.
Go to your CodeCanyon profile > Click on the Downloads tab > and then you can rate and comment on our script.
Common problems that may be encountered
Open the database/web-core.php file and delete the `date_default_timezone_set('Europe/Istanbul');` value. This should resolve the issue.
This issue may be due to a folder permissions error or an Apache problem. Contact your server/hosting provider and ask them to resolve the issue. Please note that this is not a scripting problem.
Contact your server provider, and ask them to increase post_max_size, max_execution_time and upload_max_filesize in PHP.ini file. Please note this is not a script problem.
- Please make sure that the .htaccess file is uploaded to your server and updated to latest version.
- If the file is exists, but you still face this issue, please contact your host provide, and let them enable mod_rewrite.
- If you are using a VPS with Ubuntu Linux installed, please follow this guide.
Please test your SMTP credentials at SMTPER, if the same config worked by the test, please contact us.
https://www.smtper.net/
Frequently Asked Questions (FAQs)
We don't use any third-party PHP frameworks (Laravel, CodeIgneter, etc.). NiceVideo's code structure is written entirely in pure PHP code, and we essentially use our own framework.
NiceVideo's code structure is open source, and you can edit, add to, or delete any code you want.
To ensure NiceVideo runs quickly and smoothly, all hosting providers will easily handle this task. Because NiceVideo doesn't work directly with a hosting company, you can run this script seamlessly on any hosting provider that meets our system requirements.
You can only use one domain name with a single purchase code. You will need to purchase a new license for each new domain name; please see the Envato Help Page for more information about licenses.
If you need support, or if you're facing any problems, please contact us via Envato Support
Please note that our respond can take up to 2-3 business days.
- Availability to answer questions, Answering technical questions about item’s features, Assistance with reported bugs and issues, Help with included 3rd party assets.
- Any customization request will be ignored.
- Please make sure to read more about the support policy.
About licenses
NiceVideo is made by Dayzen Software under Envato Extended & Regular License.
What is the different between Extended and Regular license?
-
If the end user has to pay to use the final product, you need an extended license; in other words, if you're going to charge your end users, you must have an extended license.
-
Both versions are similar, sharing the same features, updates, and support services.
-
Both are only valid for a single domain name, meaning you need a separate license for each domain name.
- If the end user has to pay to use the final product, you need an extended license; in other words, if you're going to charge your end users, you must have an extended license.
- Both versions are similar, sharing the same features, updates, and support services.
- Both are only valid for a single domain name, meaning you need a separate license for each domain name.
NiceVideo Changelogs
Check the NiceVideo change logs.
This section is where details of all changes made to the script will be shared.
Browse for added, fixed, or updated features.
Release date: December 8, 2025
-
The first version was released with the code v1.0
- The first version was released with the code v1.0